
The risk is not deleting too little
Pluto Photos' duplicate finder will happily delete thousands of files for you. The question that matters is whether the copy it keeps is the one you wanted, and the failure mode is silent: you free up 40 GB, feel good about it, and discover two years later that the version of your wedding photos that survived is the 900 KB one a messaging app made.
So the method below is built around one principle: never let it decide which copy dies without you having set the rule first.
Step 1: Understand what "duplicate" means
There are three quite different things Pluto Photos calls a duplicate, and they carry different risk.
Byte-identical files. Same file, copied twice. These are found by hashing the file contents, and deleting the extra copy is completely safe — there is genuinely no information difference between them. This is the biggest category in a consolidated library and it is the one to clear first.
Visually identical files. The same photo, but re-encoded, resized, rotated, or re-saved at a different quality. Found by perceptual hashing: reducing the image to a small fingerprint of its structure, so two versions of the same picture produce nearly the same fingerprint even though not one byte matches. These are real duplicates, but which copy to keep is now a decision.
Visually similar files. Burst shots, three attempts at the same group photo, a panorama's source frames. Perceptual hashing finds these too, at a looser threshold. These are not duplicates. They are different photographs that look alike, and deleting them automatically is deleting your photos.
Pluto Photos' Duplicate Finder splits this into a Scan Mode toggle with three settings: Exact uses a full file-content hash for byte-for-byte duplicates only, Near uses perceptual hashing for visually similar photos, and Both runs them together. Start with Exact.
Step 2: Run Exact mode first, and scope the scan while you're there
Run the scan in Exact mode across the whole library before touching Near. It is risk-free, it is fast, and on a library that has been merged from several backups it typically removes the majority of the total. Doing this first also makes the fuzzy pass much easier to review, because you are no longer wading through groups of eight identical copies to find the one real decision.
The scope selector next to Scan Mode lets you point the scan at the entire library, a single folder-backed album, or a smart album — useful for re-checking just this month's import rather than re-scanning everything, since a fresh consolidation is exactly when duplicates cluster. Results save automatically, so you can close the panel and come back rather than re-running a long scan from scratch; if new photos have been added since, Pluto Photos tells you and offers a rescan.
Step 3: Let Pluto Photos recommend a keeper, and know when to override it
Every group gets a recommended keep, marked with a star, chosen by default on highest resolution, then largest file size, then rating. That covers the common trap on its own: a PNG screenshot of a JPEG photo is larger than the JPEG and worse, so file size only breaks ties at equal resolution.
When the default rule isn't good enough — a burst where the biggest file isn't the sharpest frame — toggle Best Shots. It scores every photo in the loaded groups on focus, exposure, contrast and colour, and re-picks each group's keeper by that measured quality instead. It takes a few seconds to score a large scan and it's undoable: toggle it off and the file-size recommendation comes back.
Step 4: Review by group size, largest first
Sort the duplicate groups by how many files they contain (the sort control above the groups) and work down. This is not just efficiency — the big groups are almost always the safe, obvious ones (a folder copied three times), so you build up momentum and confidence before reaching the ambiguous pairs.
While reviewing, look at the paths, not just the thumbnails. A group where one copy lives in Photos/2019/ and the others live in Downloads/, WhatsApp Images/ and Desktop/temp/ is telling you exactly which one is the original.
Step 5: The four things that look like duplicates and are not
Burst and continuous-shooting frames. Eight nearly-identical shots of a child running. Keep the sharpest, but this is a photographic choice, not a cleanup.
Bracketed exposures. Three frames at different exposures for an HDR merge. They look similar to a perceptual hash and are useless individually — but if you shoot brackets, deleting two thirds of them destroys the ability to re-merge.
Your own edits. An original and a cropped, colour-corrected version you actually prefer. Both are worth keeping, and which is "the original" is now the wrong question.
RAW + JPEG pairs. If your camera writes both, they are the same photograph in two formats — and the JPEG is not a duplicate of the RAW, it is a preview of it. Pluto Photos does not group these, because the files look nothing alike to a hash, so this one mostly takes care of itself — worth knowing in case you ever see them clustered by another tool.
For any group that's a false match for one of these four reasons, click Not Duplicates on that group rather than manually unmarking every item in it — it dismisses the whole group and Pluto Photos won't resurface that pairing on the next scan.
Step 6: Keep All Recommended, then Delete Marked
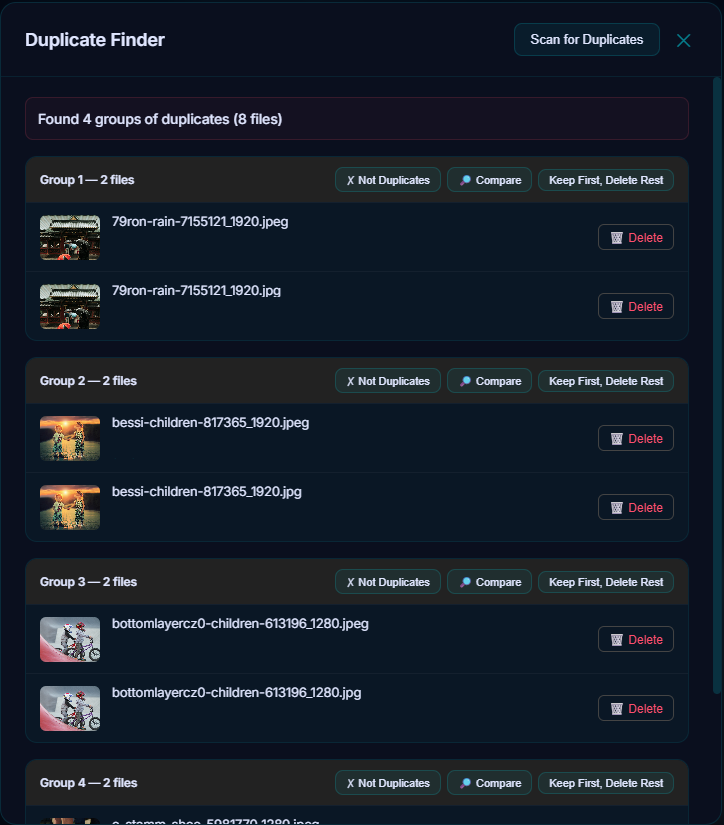
Once you trust the recommendations — the default rule, or Best Shots if you turned it on — Keep All Recommended applies them to every group in one click: it marks the starred copy as kept and queues the rest for deletion, across the whole scan at once. Used correctly it is a big time saver. Used carelessly it is how the wrong copies get deleted en masse, so the safe pattern is: click it, then scroll the whole review list before confirming, looking specifically for groups where the recommendation kept something in a suspicious folder (Downloads/, WhatsApp Images/) over the one in your real library folder. That scroll takes minutes, not hours, and it's the step that catches a systematic mistake rather than one bad group.
Nothing is deleted yet — this step only queues files. Individual groups you'd rather handle by hand still have their own Keep Recommended and Keep First, Delete Rest buttons if Keep All Recommended got one wrong.
Step 7: Delete Marked, to the recycle bin, not permanently
Click Delete Marked, which shows the count and total size queued and asks you to confirm. This is the single most important safety rule and it costs nothing: Pluto Photos sends removals to the system trash rather than unlinking them — so even though the confirmation dialog reads "permanently remove" to make you stop and think, the files are recoverable from your OS trash if you catch a mistake. Don't empty it for a month. If you find something missing, it is right there.
Step 8: Verify before you empty the trash
After the pass, three checks:
- Photo count. Did it drop by roughly what you expected? A far bigger drop than expected means Near mode caught more than it should have.
- Spot-check a few years. Open a month you remember and confirm nothing obvious is gone.
- Check total library size. The space reclaimed should be plausible against the count removed — at 3–5 MB per photo, removing 6,000 duplicates should free somewhere in the region of 20–30 GB. An implausible number in either direction is worth investigating before emptying the bin.
Doing it regularly is easier than doing it once
The reason people end up with 6,000 duplicates is that the job only ever gets done during a crisis. Running the scan after each big import — a Takeout export, a phone backup, an SD card dump — keeps the number in the dozens, and dozens is a five-minute review rather than an afternoon. Scope the scan to the album you just imported rather than the whole library, and it finishes in seconds.
Getting started
The duplicate photo finder is part of the Pro tier. It uses perceptual hashing, so it catches resized and re-encoded copies rather than only matching filenames, and the whole scan runs locally — no photos are uploaded to compare them. If you are mid-consolidation, the guide to organizing a very large library covers where de-duplication fits in the order of operations, and this is what a real 6,000-duplicate cleanup looked like. Download Pluto Photos to try it — the free tier will scan a 500-photo folder, which is enough to see how the grouping behaves before you point it at everything.